All guidesSettings, branding and your public page
User guides

Settings, branding and your public page

Studio Settings is a seven-tab page: General, Classrooms, Classes, Branding, Landing Page, Payments and Emails. It needs the Manage studio settings permission — owners and admins hold it by default. Without it, opening the page quietly returns you to the studio dashboard rather than showing a refusal.

Fill in your studio details

Sidebar → Administration → Studio Settings · /studios/{studioId}/settings

  1. Open the General tab. The card is called "Studio Information".
  2. Update Studio Name, URL Slug, Description, Street Address, "Apt, Suite, Unit", City, State, ZIP Code, Phone, Email, Website and Timezone.
  3. Click Save Changes.
  • Phone is US-only: the help text reads "US numbers only. Saved as +1XXXXXXXXXX."
  • If details are missing you get a red alert above the card headed "Finish setting up your studio", listing what is absent. It is a prompt, not a block — the save still goes through. Owners often assume it is stopping them. It is not.
Control your listing in the Catomni Studio Directory

Studio Settings → General

You are listed by default. This is an opt-OUT, not an opt-in — there is nothing to do here unless you want to be hidden.

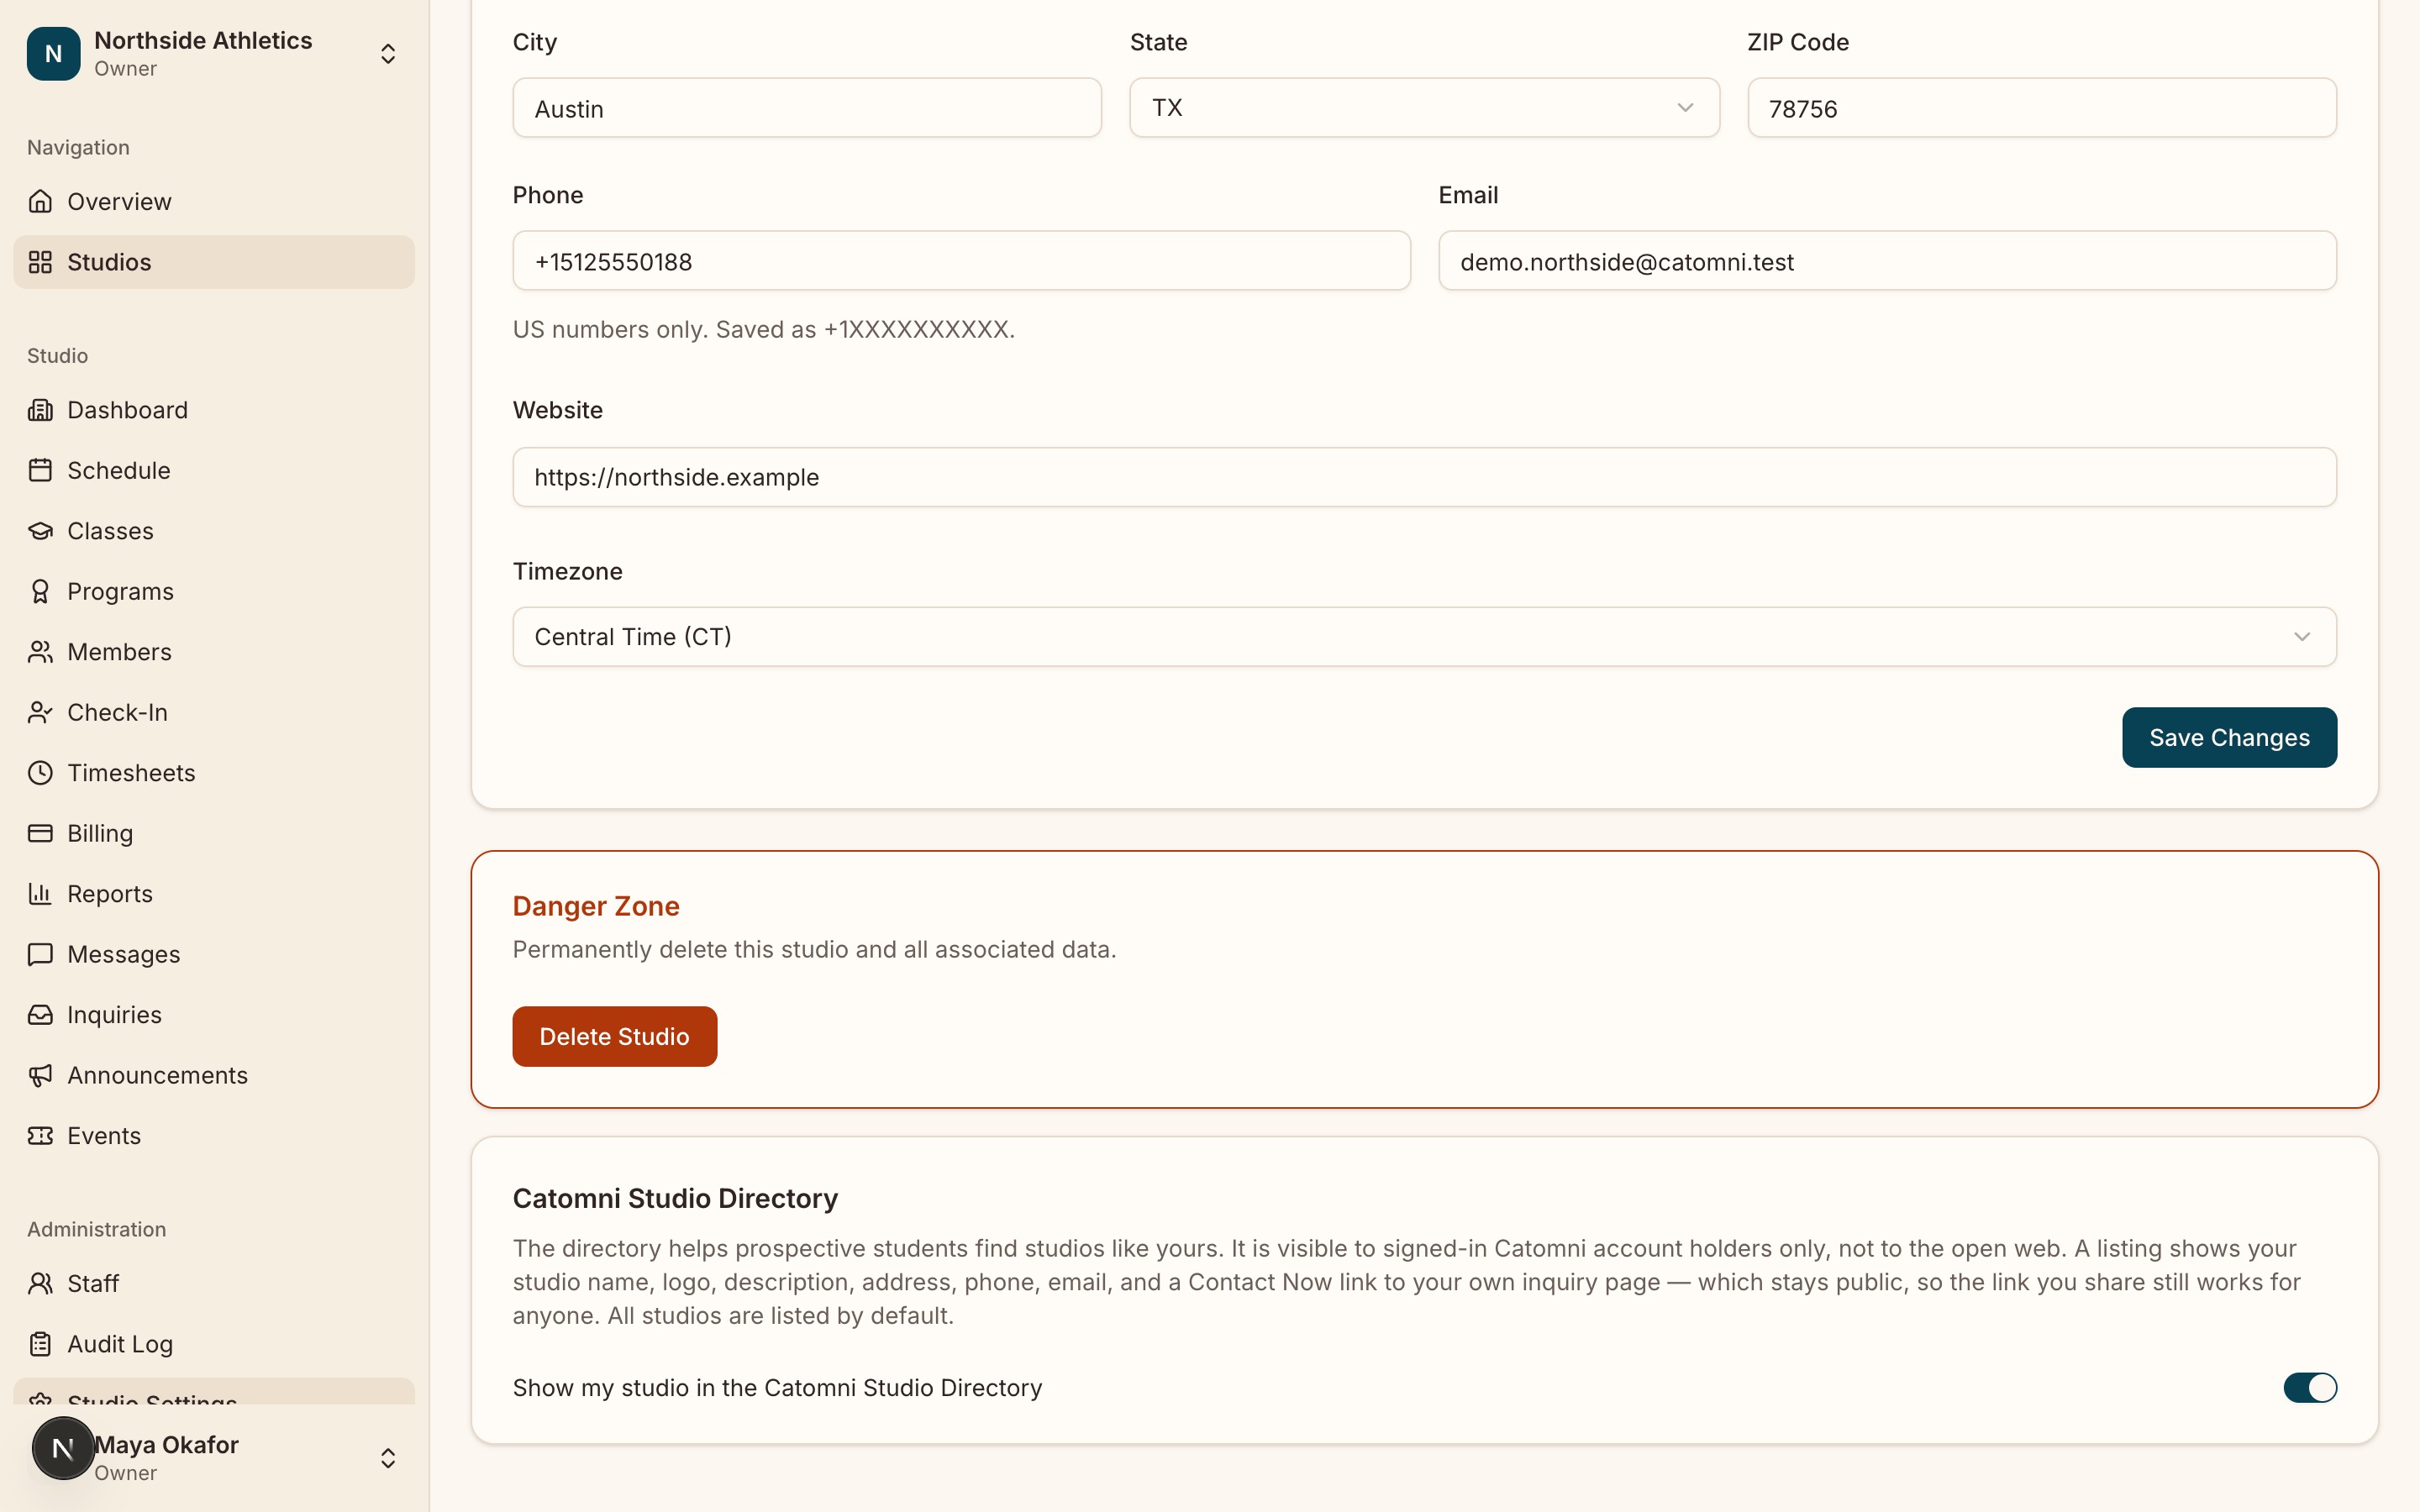
  1. On the General tab, find the "Catomni Studio Directory" card.
  2. The "Show my studio in the Catomni Studio Directory" switch is already on. Turn it off to be hidden.
  • There is no Save button on this card. The switch writes immediately and confirms with "Your studio is hidden from the directory", or "Your studio is listed in the directory" when you turn it back on. If the write fails the switch flips back on its own.
  • The directory is visible to signed-in Catomni account holders only, not to the open web. Your Contact Now inquiry page stays public either way, so a link you have already shared keeps working for anyone.
  • A newly created studio is not directory-approved when it is created, so the switch is your half of the decision rather than the whole of it. Both must hold: a platform admin approves that you may be listed, and this switch says whether you want to be.
The General tab scrolled to the "Catomni Studio Directory" card, with the listing switch and the line stating whether the studio is currently listed.
The switch writes immediately — there is no Save button on this card.

Put your logo and colours on it

Studio Settings → Branding

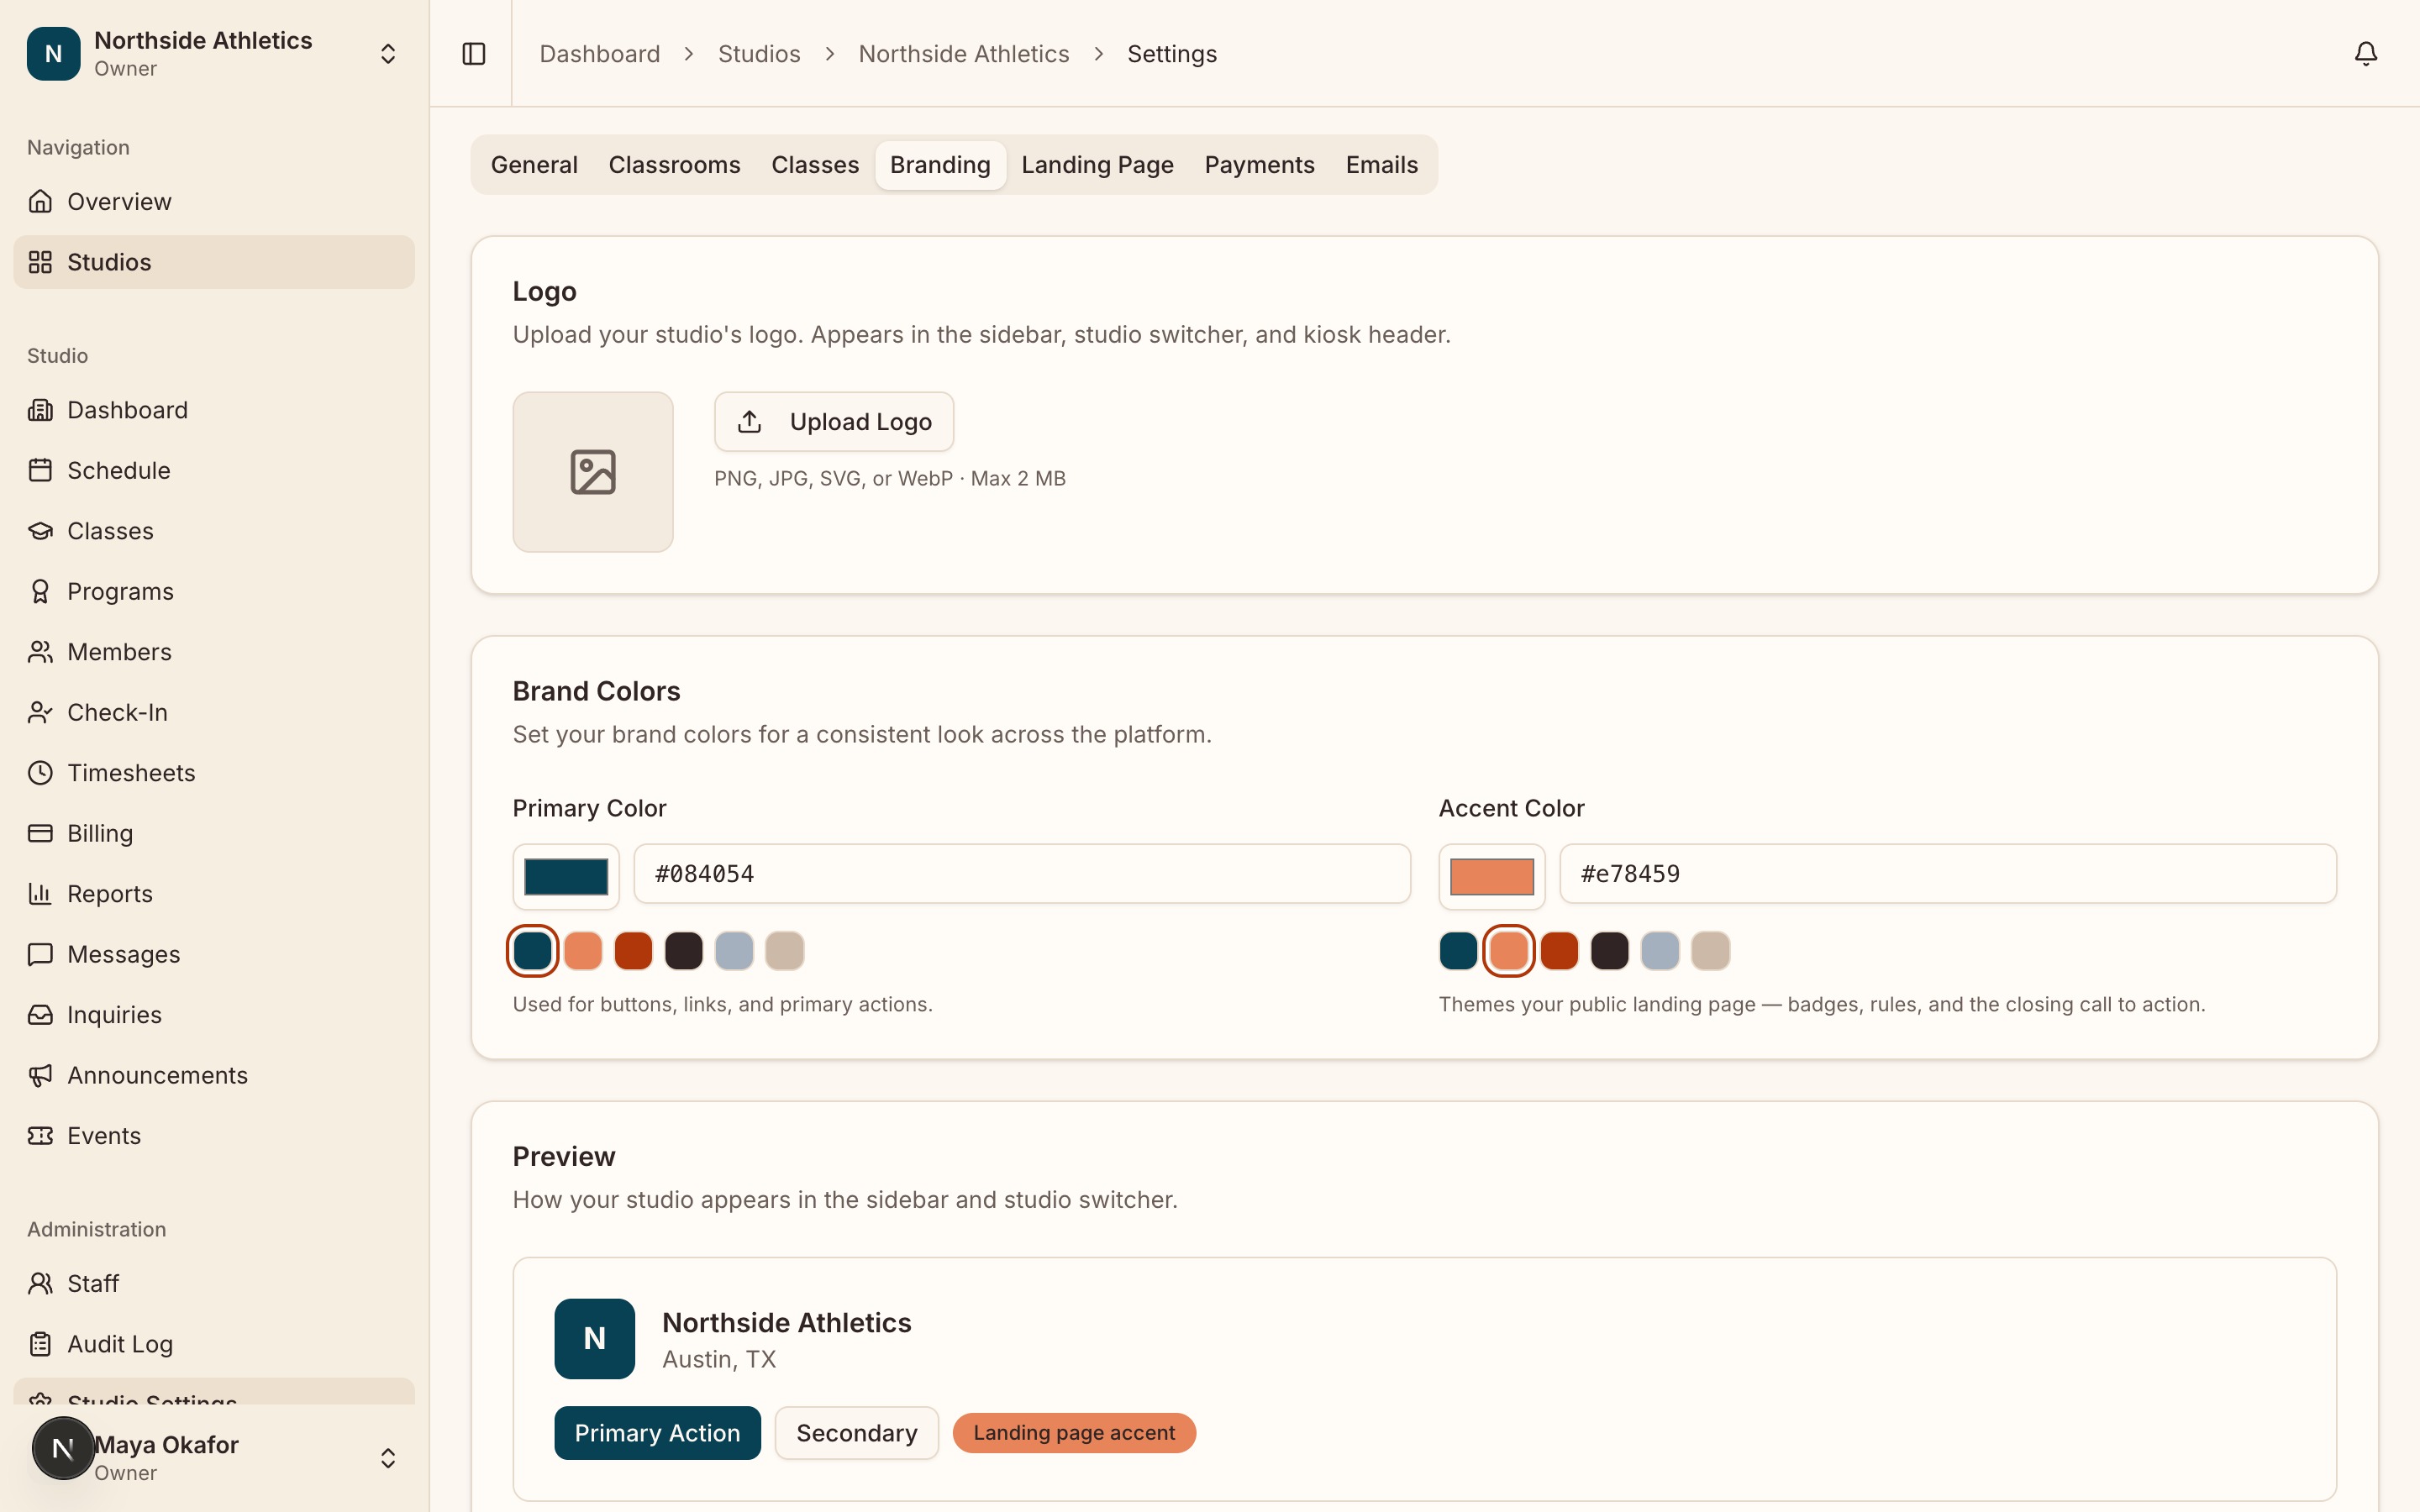
  1. Open the Branding tab. It has three cards: Logo, Brand Colors and Preview.
  2. Upload your logo. The card notes where it shows up: "Appears in the sidebar, studio switcher, and kiosk header."
  3. Set your colours in Brand Colors — the inputs are placeheld with #084054.
  4. Check the Preview card, then click Save Branding.
  • Save Branding is disabled while an upload is still running. Wait for it.
The Branding tab showing the logo upload area, the Primary and Accent colour pickers with what each one is used for, and the live sidebar preview beneath them.
Your logo and colour follow the studio everywhere a family sees it.

Publish your landing page

Studio Settings → Landing Page

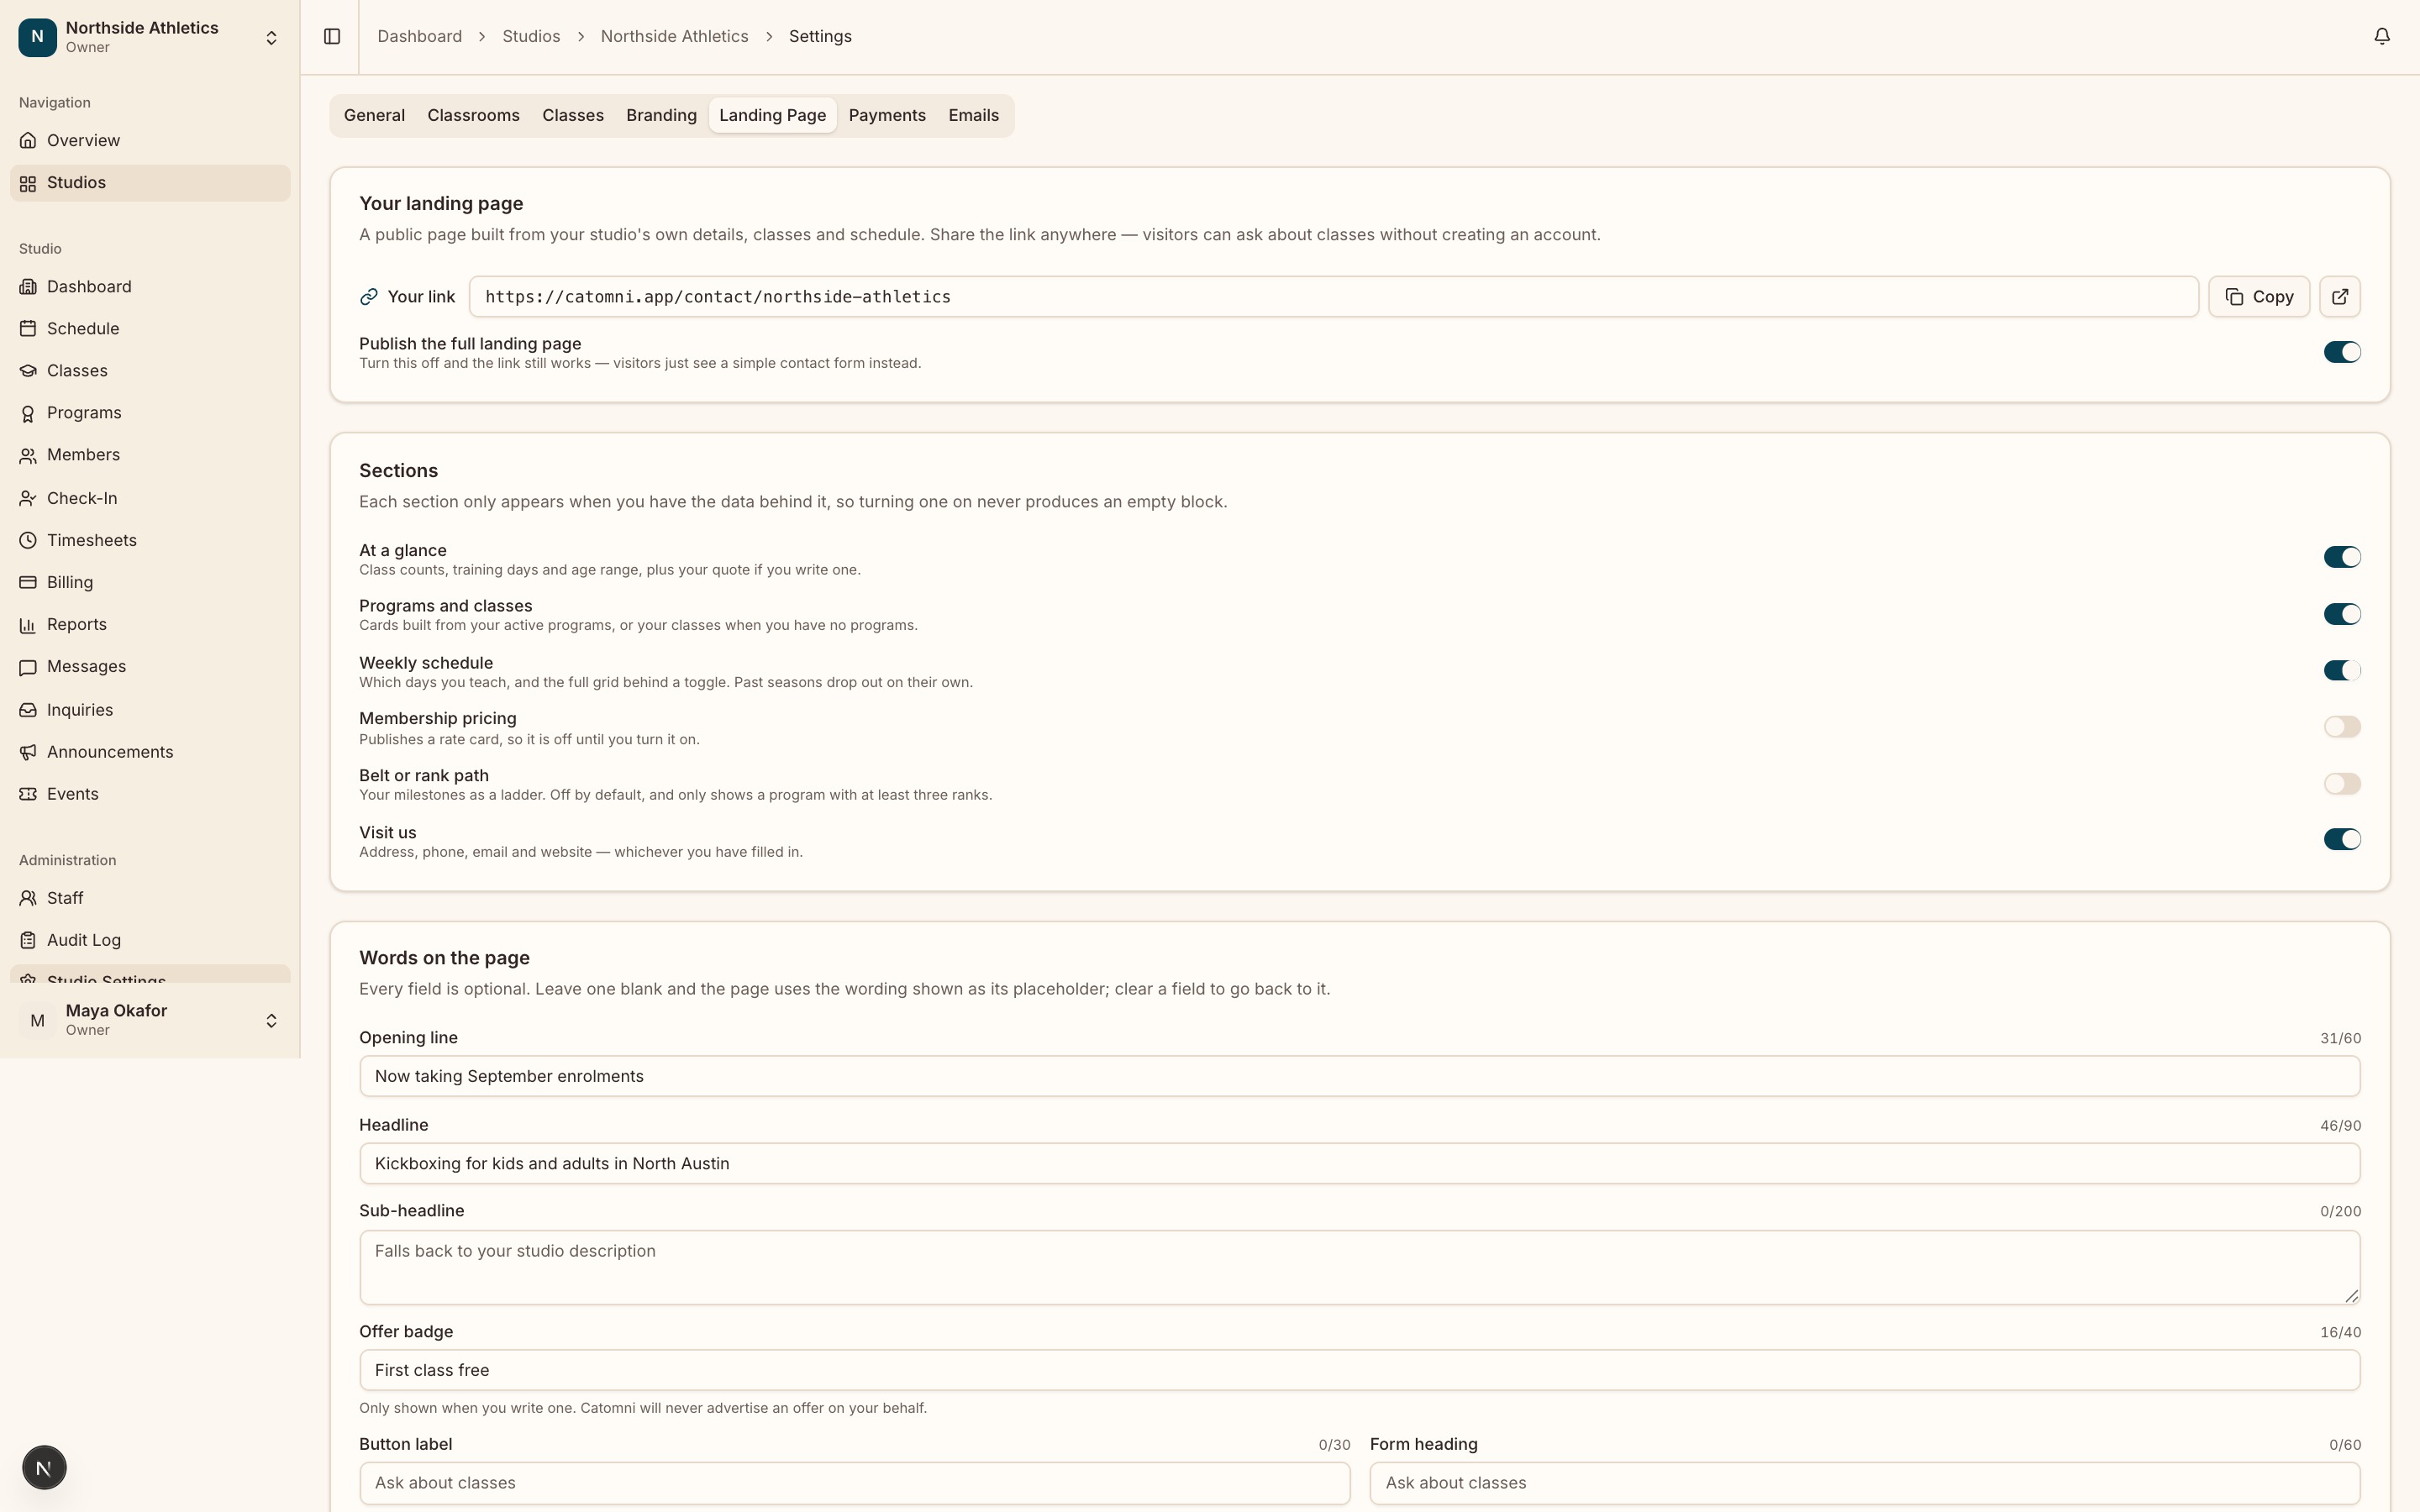
Every studio gets a public page at /contact/your-slug. The Landing Page tab controls what visitors see there.

  1. Open the Landing Page tab. The "Your landing page" card shows the real public URL in a read-only field.
  2. Click Copy to put the link on your clipboard — it confirms with "Link copied — add it to your website". The icon button beside it opens the page in a new tab.
  3. In the "Sections" card, switch on the blocks you want: "At a glance", "Programs and classes", "Weekly schedule", "Membership pricing", "Belt or rank path" and "Visit us".
  4. In "Words on the page", write any of the Opening line, Headline, Sub-headline, Offer badge, Button label, Form heading, Closing headline and Highlights. Every one is optional.
  5. Add a testimonial in "What people say" — Quote and "Who said it".
  6. Decide whether the "Enquiry form" card should "Require a phone number".
  7. Save at the bottom of the page.
  • Sections only render when you have the data behind them. The card says so: "Each section only appears when you have the data behind it, so turning one on never produces an empty block."
  • "Membership pricing" publishes a rate card, so it is off until you deliberately turn it on. "Belt or rank path" is also off by default and only shows a program with at least three ranks.
  • Turning off "Publish the full landing page" does not take the page down. The link still works — visitors just get a simple contact form instead.
  • Leave any of the "Words on the page" fields blank and a sensible default is used.
The Landing Page tab with the "Your landing page" card at the top (showing a real /contact/{slug} URL and the Copy button) and the "Sections" card below with several switches on.
Sections switch on and off individually — none of them can produce an empty block.

Decide what parents may do to their own membership

Studio Settings → Payments

  1. Open the Payments tab.
  2. In "Membership Pauses", decide whether to "Allow parents to pause their own membership", then set "Maximum pause length (days)" and "Pauses per year". Save that card.
  3. In "Membership Cancellations", decide whether to "Allow parents to cancel their own membership". Save that card too.
  • Each card saves separately. Two cards, two save buttons.
  • Despite the name, this tab has no Stripe setup on it at all. Stripe lives on the Billing page — see the payments section below.
  • Leave self-service pausing off and families can still ask: they get a dated request that you approve or decline instead.

Add your classrooms

Studio Settings → Classrooms

A classroom is a prerequisite for creating a class, so this is worth doing before you build the timetable.

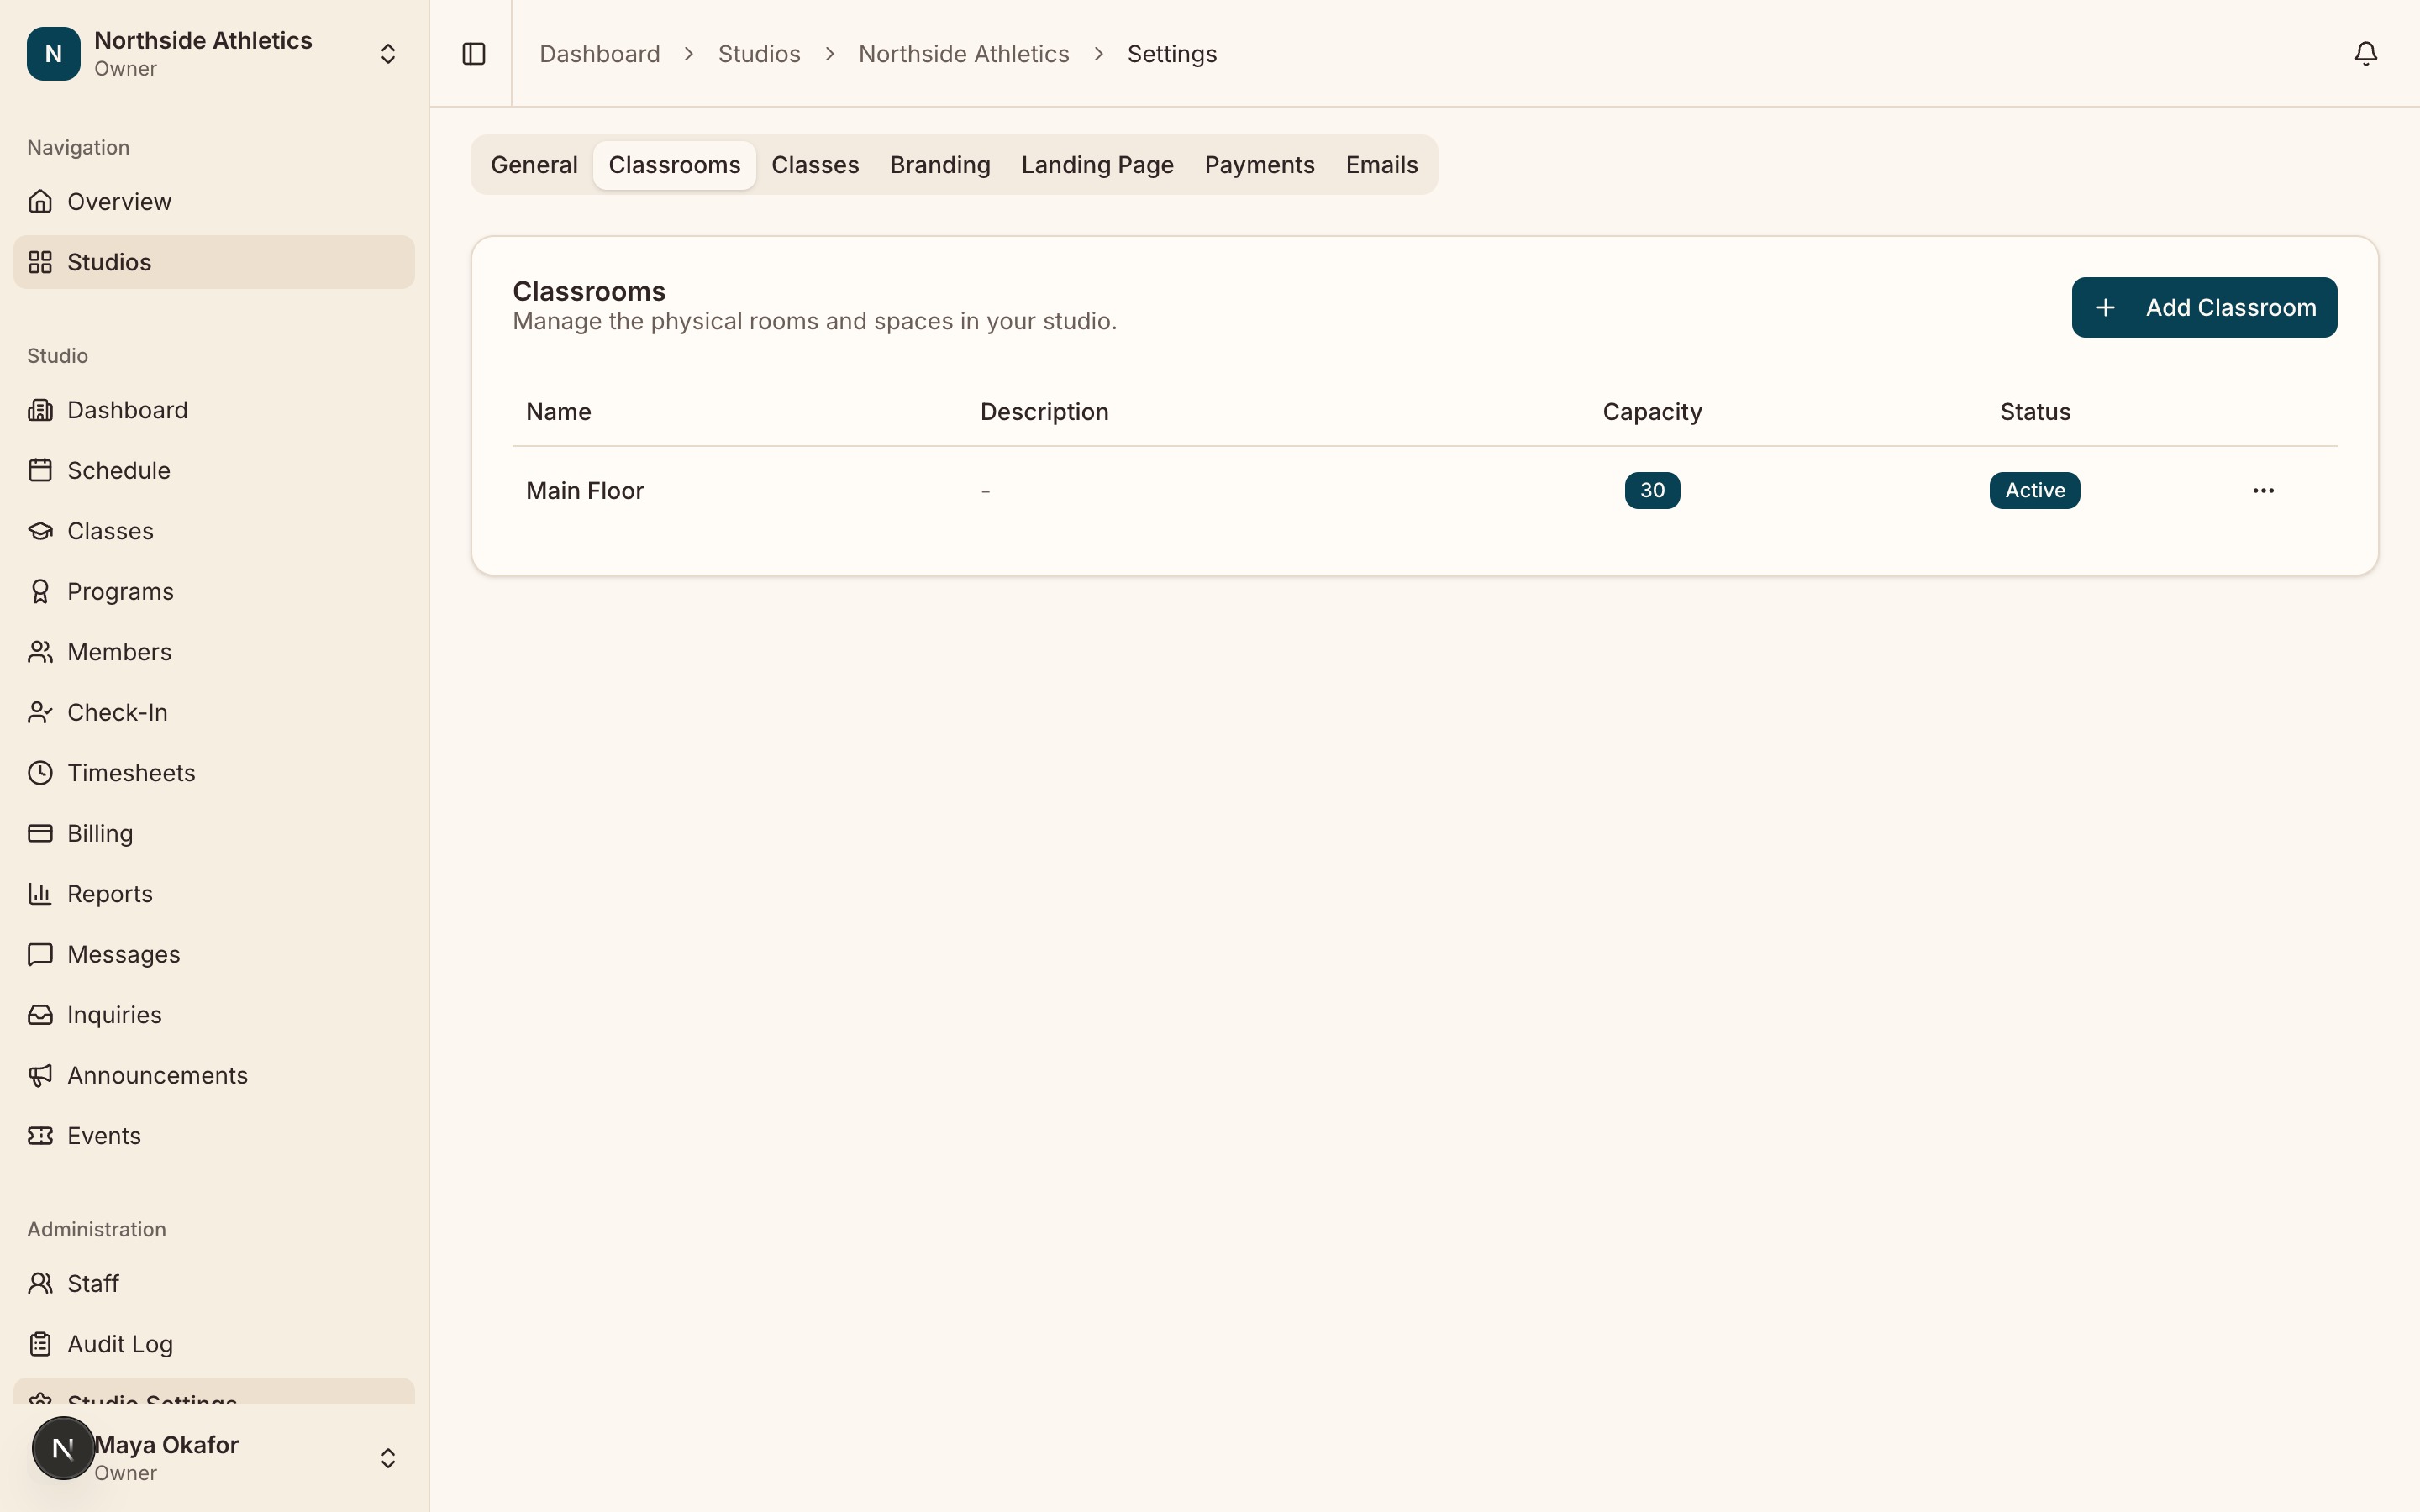
  1. Open the Classrooms tab and click Add Classroom.
  2. In the "Add Classroom" dialog fill in Name, Capacity, and optionally Description.
  3. Save. The table lists Name, Description, Capacity and Status (Active or Inactive).
  • The row menu edits a classroom or deactivates it.
  • You can also add one without leaving the class form — see "Create a class" below.
The Classrooms tab listing the rooms that already exist, with their capacities and the control for adding another.
Rooms are optional, but a class without one reads as "No Room" on the check-in screen.

Set the options your class form offers

Studio Settings → Classes

  1. Open the Classes tab.
  2. Edit the lists in "Class Form Options" — these are the categories and skill levels that appear in the class create form.
  3. Set "Age Limit Unit" to Months or Years. This flips the age labels on the class form.
  4. Manage saved class and program templates in "Saved Templates". Deleting one asks "Delete this template?" first.

Still stuck on something?

The support portal has the rest, and a real person on the other end of it.